• Home
  • About Us
    • Our Mission
    • Our Laboratory
    • Our Management Team
    • Our Clinic
    • Case Studies
    • Newsletter
    • Policies >
      • Terms & Conditions
      • Warranty & Remake
      • Cross Infection Control
      • Complaints Handling
      • COVID19
      • Terms of Use
      • Privacy Policy
    • Press
    • Working Times & Deliveries
    • Postage Portal
  • Our Services
    • Pay online
    • Price List
    • Bremadent Clinic
    • Digital >
      • Digital Dentures
      • Dental 3D Printed Models Shop
      • CAD-CAM
      • Dental 3D Printing
      • Digital Study Models
      • Digital Crown & Bridge
      • Digital Implantology
      • Digital Prosthetics
    • Crown & Bridge >
      • All ceramic >
        • Veneers
        • IPS e.max
        • Layered Zirconia Crowns (Cercon)
        • Full Contour Zirconia Crowns
        • Composite
      • Complex / Combination
      • Porcelain Bonded
      • Full Metal Crowns
      • Smile Make Overs & Diagnostic Wax Ups
      • Shade Matching
      • Executive Service
    • Implantology >
      • All on X immediate Implant Loading
      • Implant Crown & Bridge
      • Implant Prosthetics
      • Implant Milled Bars
      • Tempaplant 3 in 1
    • Prosthetics (Dentures) >
      • Digital Dentures
      • Swissedent Cosmetic Dentures
      • Valplast Flexible Dentures
      • Cobalt Chrome (CoCr)
      • Hybrid Chromes
      • Acetal frameworks / tooth coloured clasps
      • Characterised / Special effects
      • Denture Repairs
      • Fiber Force
    • Pressure Formed >
      • Anti - Snoring Devices
      • Gum Shields
      • Night / Mouth Guards
      • Whitening Trays
    • Orthodontics >
      • Kois Deprogrammer
      • Essix Retainers
      • Michigan / Tanner Splints
      • Zirconia Retainers
    • Clinical Guides
    • Downloads
  • App
  • News
  • Employment
  • Contact Us
Bremadent Dental Laboratory - London UK
  • Home
  • About Us
    • Our Mission
    • Our Laboratory
    • Our Management Team
    • Our Clinic
    • Case Studies
    • Newsletter
    • Policies >
      • Terms & Conditions
      • Warranty & Remake
      • Cross Infection Control
      • Complaints Handling
      • COVID19
      • Terms of Use
      • Privacy Policy
    • Press
    • Working Times & Deliveries
    • Postage Portal
  • Our Services
    • Pay online
    • Price List
    • Bremadent Clinic
    • Digital >
      • Digital Dentures
      • Dental 3D Printed Models Shop
      • CAD-CAM
      • Dental 3D Printing
      • Digital Study Models
      • Digital Crown & Bridge
      • Digital Implantology
      • Digital Prosthetics
    • Crown & Bridge >
      • All ceramic >
        • Veneers
        • IPS e.max
        • Layered Zirconia Crowns (Cercon)
        • Full Contour Zirconia Crowns
        • Composite
      • Complex / Combination
      • Porcelain Bonded
      • Full Metal Crowns
      • Smile Make Overs & Diagnostic Wax Ups
      • Shade Matching
      • Executive Service
    • Implantology >
      • All on X immediate Implant Loading
      • Implant Crown & Bridge
      • Implant Prosthetics
      • Implant Milled Bars
      • Tempaplant 3 in 1
    • Prosthetics (Dentures) >
      • Digital Dentures
      • Swissedent Cosmetic Dentures
      • Valplast Flexible Dentures
      • Cobalt Chrome (CoCr)
      • Hybrid Chromes
      • Acetal frameworks / tooth coloured clasps
      • Characterised / Special effects
      • Denture Repairs
      • Fiber Force
    • Pressure Formed >
      • Anti - Snoring Devices
      • Gum Shields
      • Night / Mouth Guards
      • Whitening Trays
    • Orthodontics >
      • Kois Deprogrammer
      • Essix Retainers
      • Michigan / Tanner Splints
      • Zirconia Retainers
    • Clinical Guides
    • Downloads
  • App
  • News
  • Employment
  • Contact Us

Bite Registration In Dentures - Clinical Guide

10/15/2023

0 Comments

 
Picture

How to take a denture bite registration for complete dentures?

Taking a wax bite registration is a crucial part of fabricating complete dentures, it allows information from the patient to be transferred to the dental laboratory to manufacture a denture based on the patients unique parameters. The information used allows the dental laboratory to provide a tooth set up within the parameters traditionally or CAD, 3D printed.

The same information from a wax bite registration applies to both traditional and digital methods of constructing complete dentures.

The first stage of any denture case is: Patient details & history, denture history, E/O & I/O examinations, diagnoses, prognosis, treatment options and a treatment plan.

How to take bite registration is broken down into 3 steps:

Step 1: Orientation
Step 2: Facial and smile features
Step 3: Register the bite

Tools: Fox’s bite plane, rim former, Willis gauge, wax knife, Bunsen burner, PVS dispensing gun

Materials: Wax, bite registration paste

Functions of a bite registration in complete dentures:
  1. Aesthetics – facial and smile features
  2. Function – Jaw relationship, OVD, neutral zone
  3. Phonation
  4. Tissue support
  5. Orientation – Horizonal & occulsal planes

How are wax bite blocks used in digital dentures?
  1. The wax bite rims are CAD scanned with either the model or I/O impression scan and turned into 3D objects
  2. The 3D wax bite registration is used as reference points based on the patient parameters e.g centre line, horizontal plane etc
  3. The CAD software automates a tooth set up based on the parameters
  4. The 3D wax bite reg is used as a transparent overlay with the orientation, facial/ smile features and OVD shown over the tooth set up
  5. This allows for manual modifications of the tooth set up within the wax bite parameters of the wax bite rim

Picture
A wax bite CAD scanned into a 3D object.
Picture
Maxilla cast CAD scanned into a 3D object.
Picture
Mandible cast CAD scanned into a 3D object.
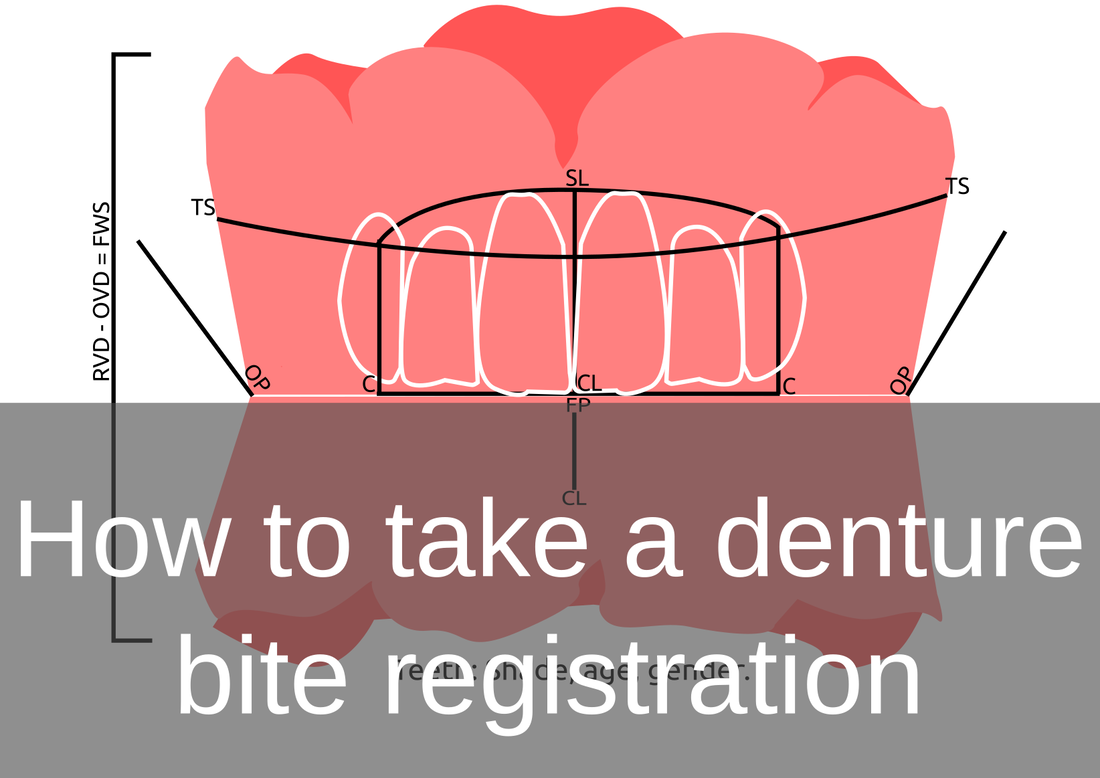
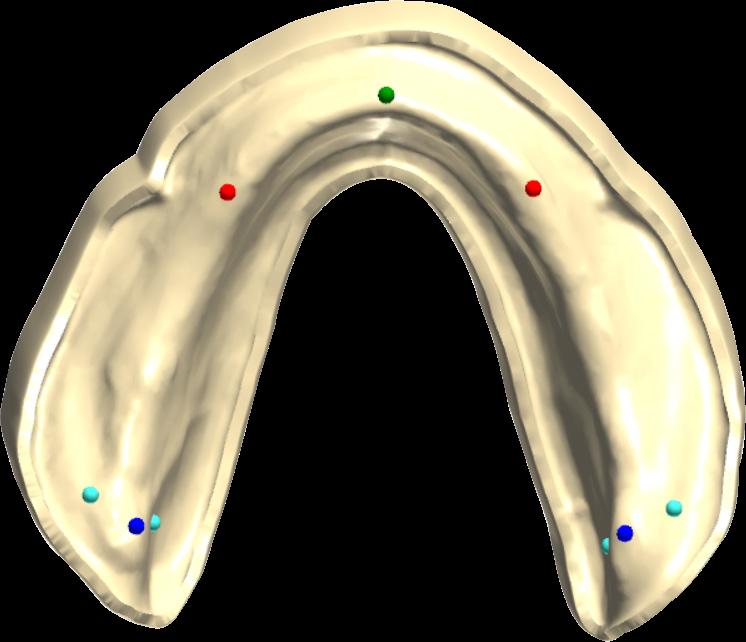
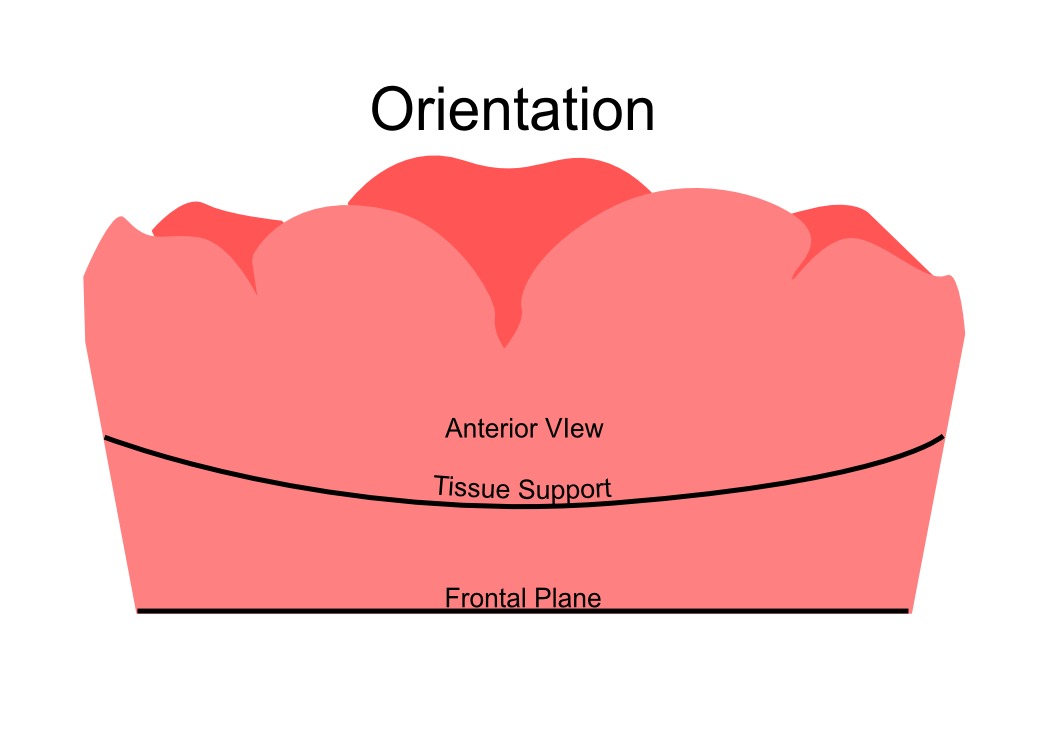
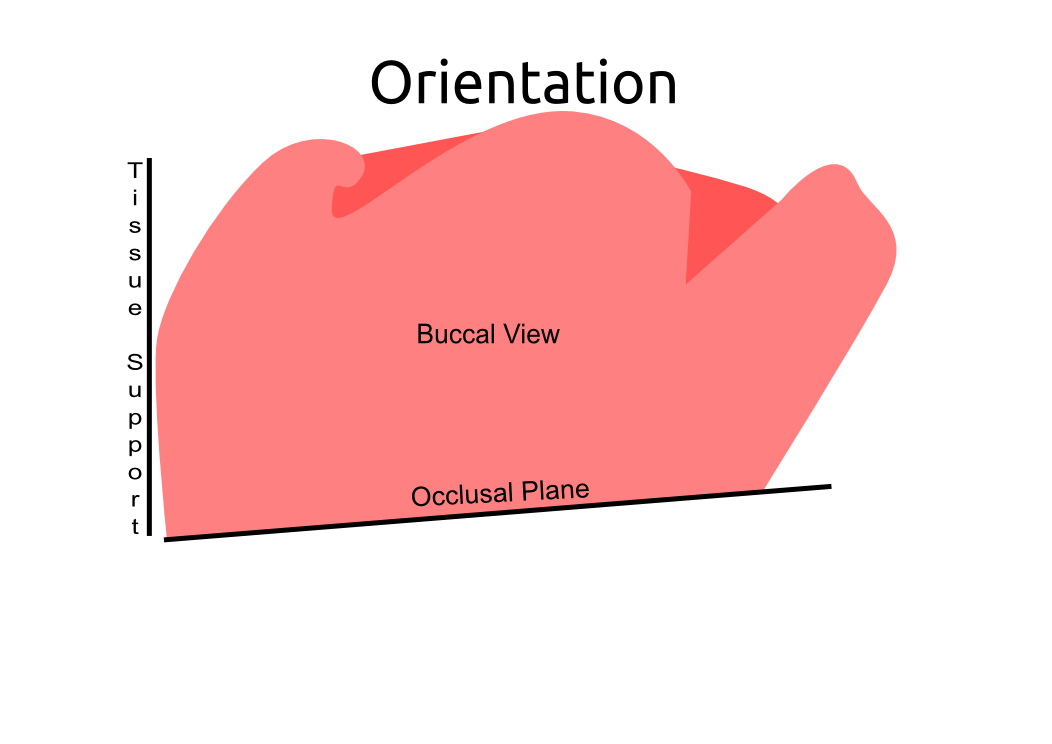
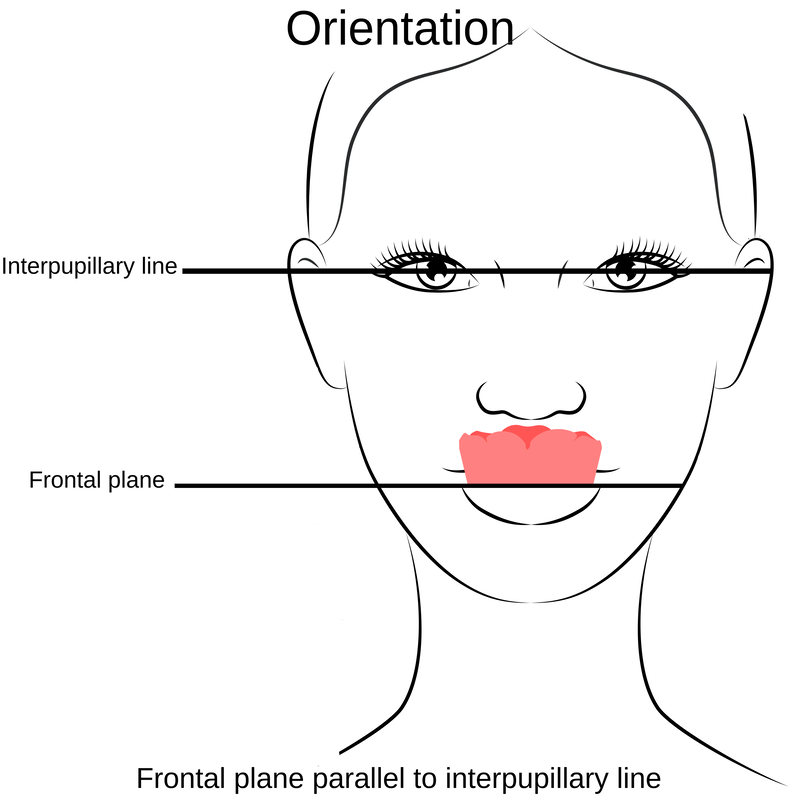
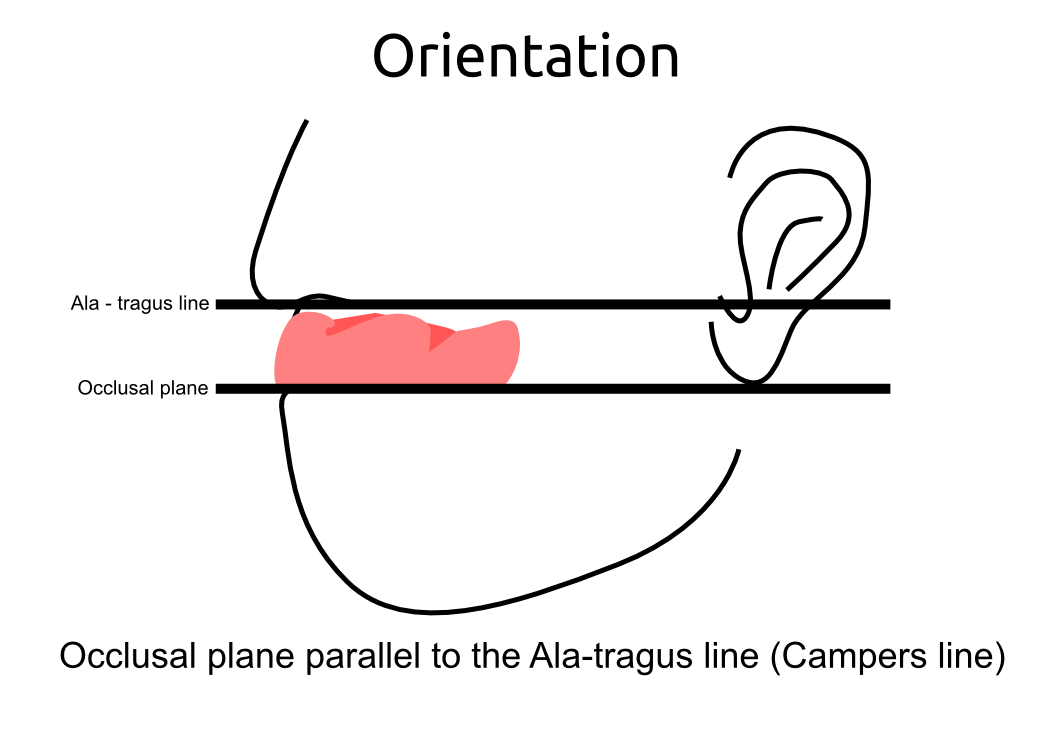
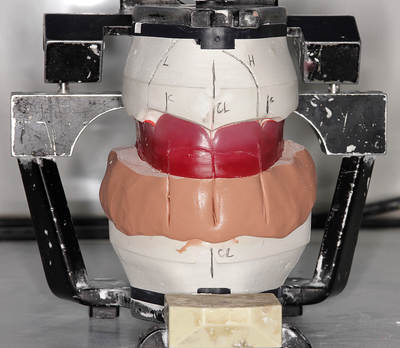
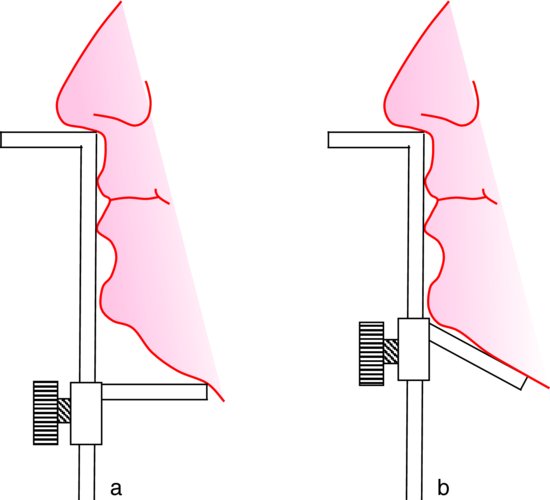
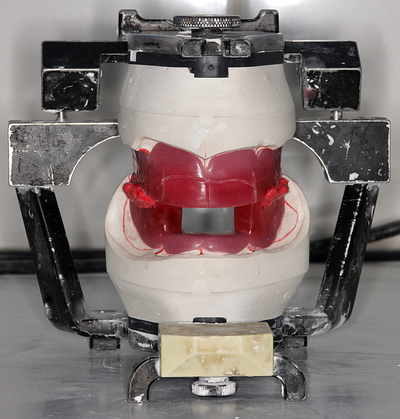
Information from the patients orientation, jaw relationship, OVD, facial & smile features creates the parameters for the dental technician to work within, as the technician will not see the patient, we have to provide this information in a form that they will understand e.g lines scribed on a bite rim or adjusting the bite rim.

The retention, extension, stability and support of each base plate would be the assessed individually before continuing. If any of the above is not correct preform an imp wash inside of the base plate and have a new model made. If all of the above is sufficient, continue assessment: 

Step 1: Orientation

Orientation: Frontal Plane & Occulsal Plane
A Fox’s bite plane tool is used to establish the orientation of the occlusal plane in an anteroposterior direction (Spee curve) and also the frontal plane against the interpupillary line.

With the use of a fox’s bite plane, we assess  the frontal plane by placing the fox plane on the bite block anteriorly and checking if it's parallel to the interpupillary line. Adjust the anterior section, if one side is higher or lower until this is level and parallel to the interpupillary line. Use a heated Rim Former or carve the wax.

The occlusal plane is assessed by placing the fox plane in the same position and placing a horizontal device e.g ruler from the ala of the nose to the tragus of the ear and making sure the orientation of the fo’x bite plane is parallel to to this.

This will set the parameters of how the anterior and posterior teeth will be placed for aesthetics, phonetics, comfort, chewing efficiency and balanced occlusion.  

Tissue support is determine by preference, clinical decision e.g checking the profile buccally of the previous denture. This determines how far the anterior teeth will be positioned forward and how thick the anterior flange will be.
Picture
Picture
Picture
Picture
Picture
A 3D scan of a wax bite, adjusting the occulsal plane
Picture
A 3D CAD tooth setup in relation to the orientation of the bite rim

Picture
A tooth setup in accordance with the patients orientation
Picture
A tooth setup in accordance with the patients orientation

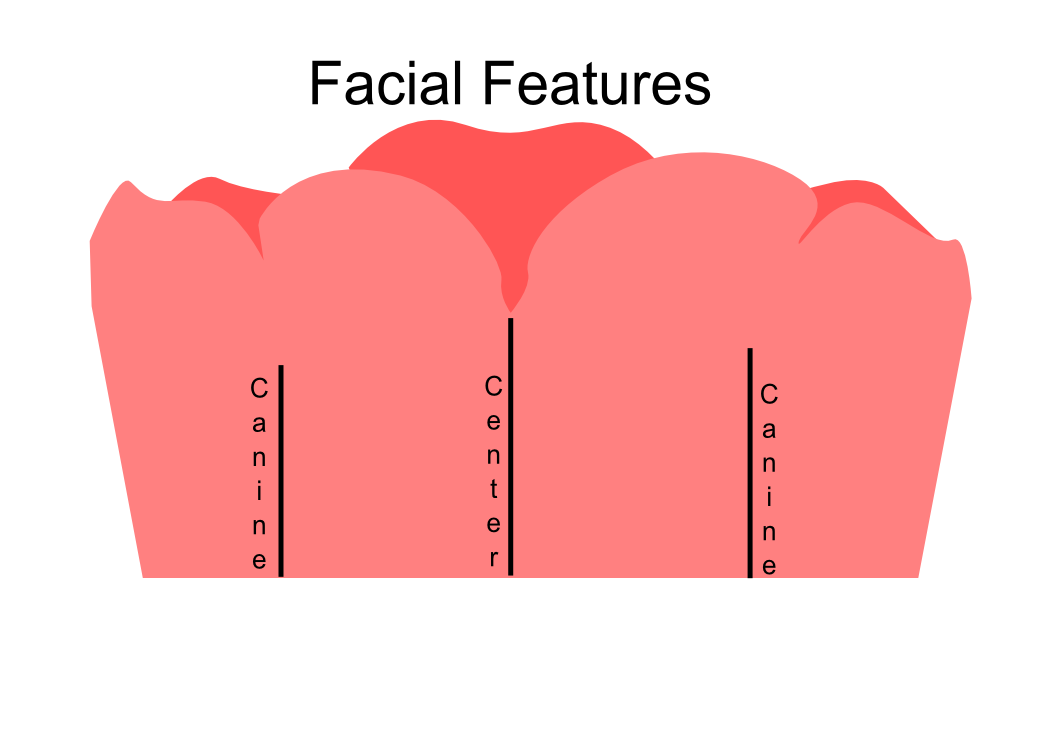
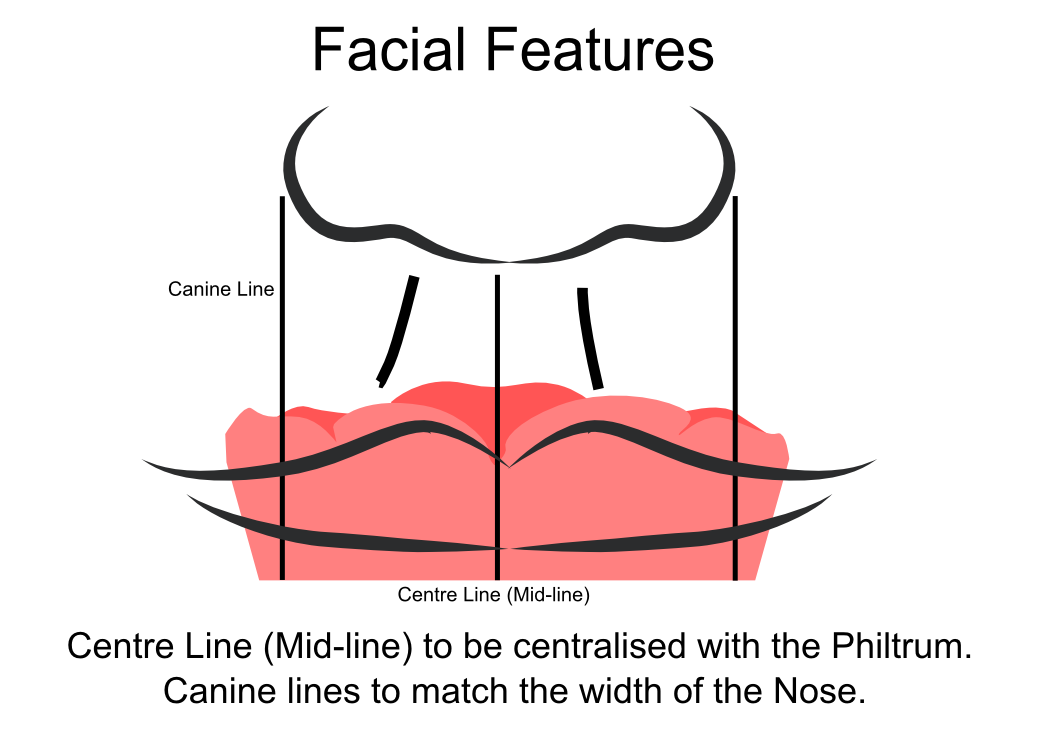
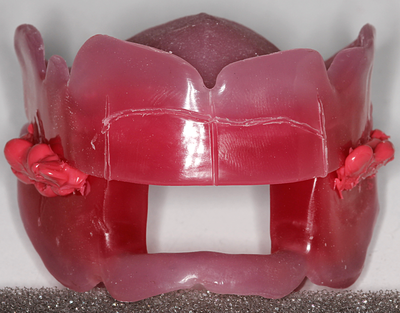
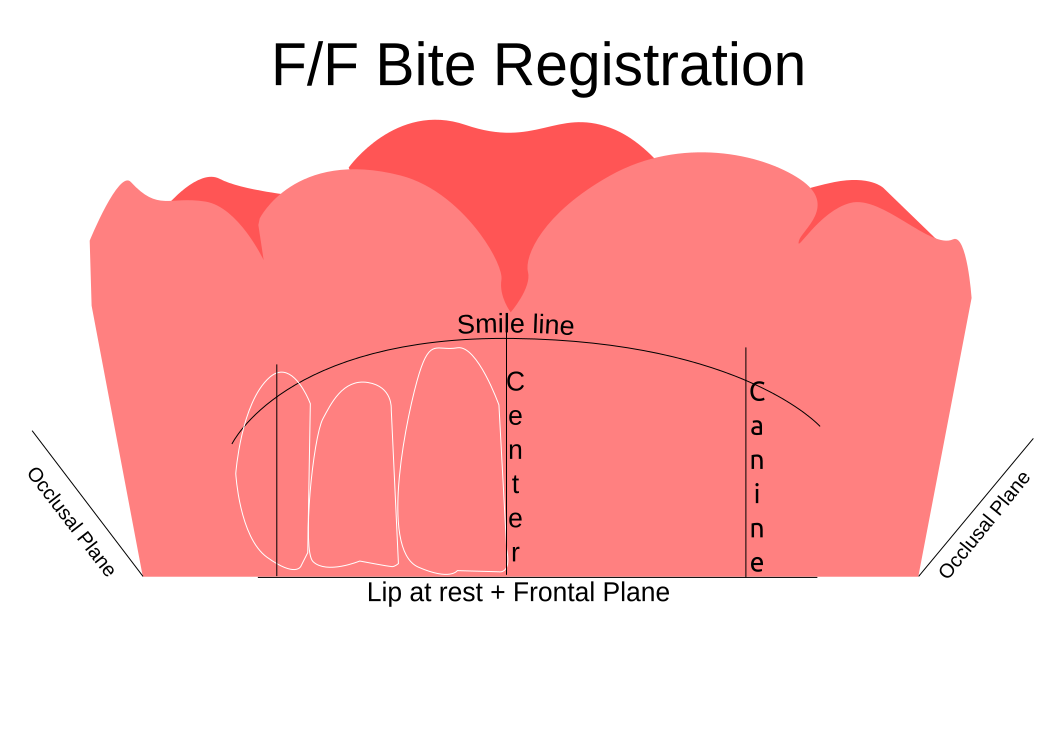
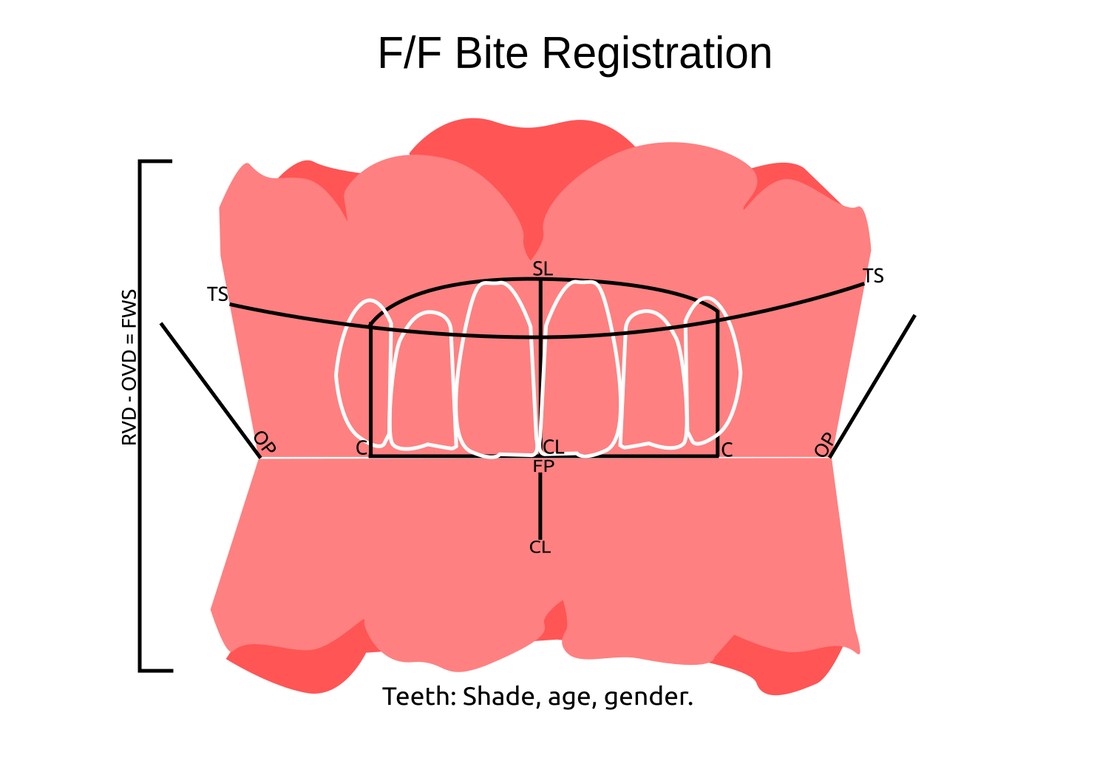
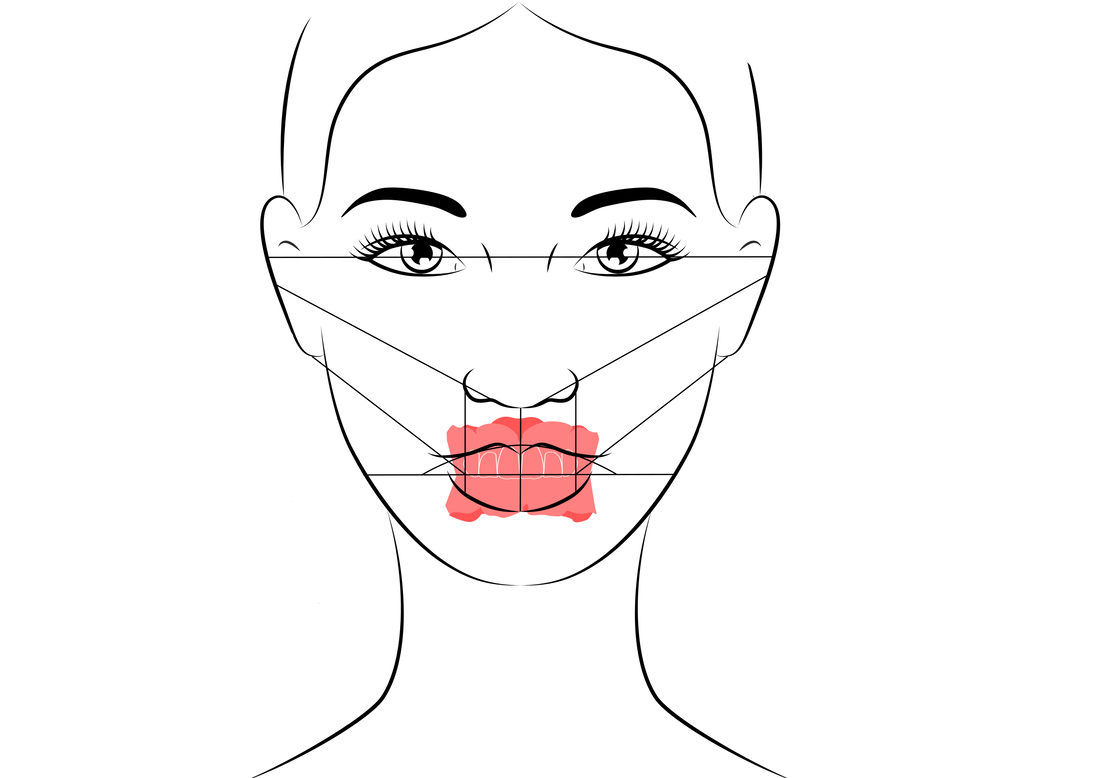
Step 2: Facial & Smile Features

Facial Features
Facial features sets the aesthetic parameters for the anterior teeth in terms of mould size, shape and selection, e.g width and height of anterior teeth & positioning of the teeth within the centre line & canine lines. All facial features should be scribed onto the upper bite registration with a cold wax knife, DO NOT use a hot wax knife as you can injure the patient.

Centre  line:
The centre line (mid line) is dictated via the philtrum, DO NOT use the nose, as this can give a false reading, as the nose is not usually centralised with the mid line of the face, and can be skewed. This allows for centralisation of the upper centrals to the exact mid-line of the patient.  

Canine line:
The canine lines are dictated via the width of the nose, this is common in 95% of humans. This determines the width of the anterior teeth in relation to the patient. The canines, should not go past this line, unless other factors dictate the canine lines e.g patient preference. The body / labial mesial body should be on or just after this line in the tooth set up, this will allow a natural alignment within the patients facial features.
Picture
Facial features on a wax bite rim
Picture
Facial features in relation to patient
Picture
Facial feature markings on a physical bite rim

Picture
Information transfered to the dental laboratory
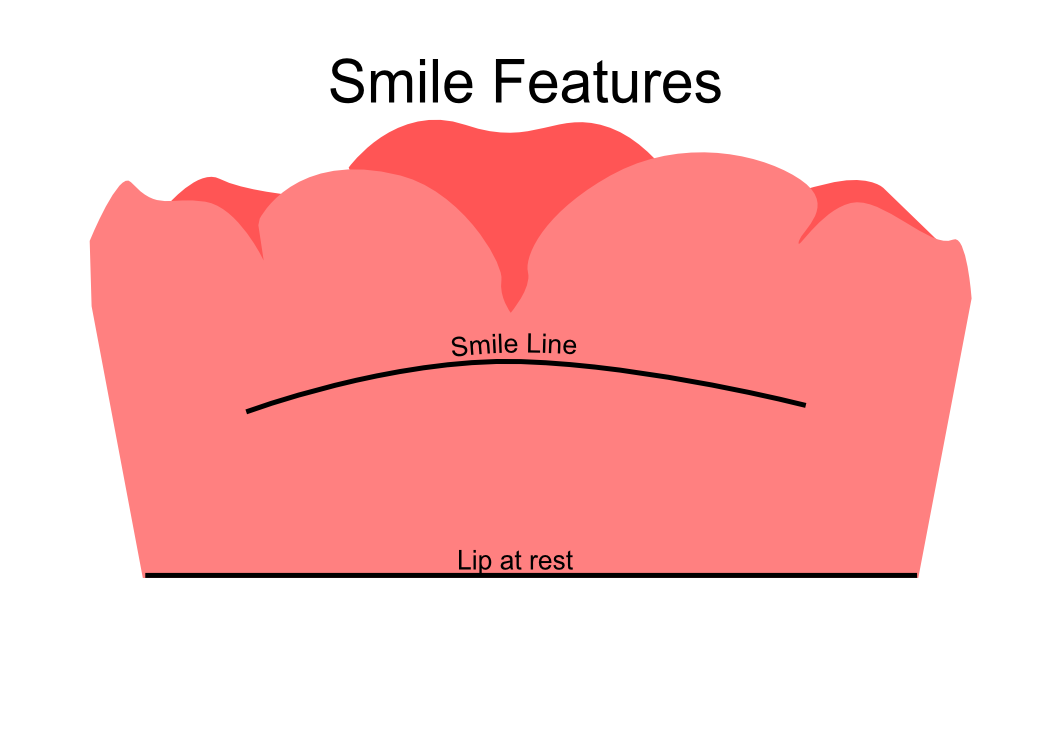
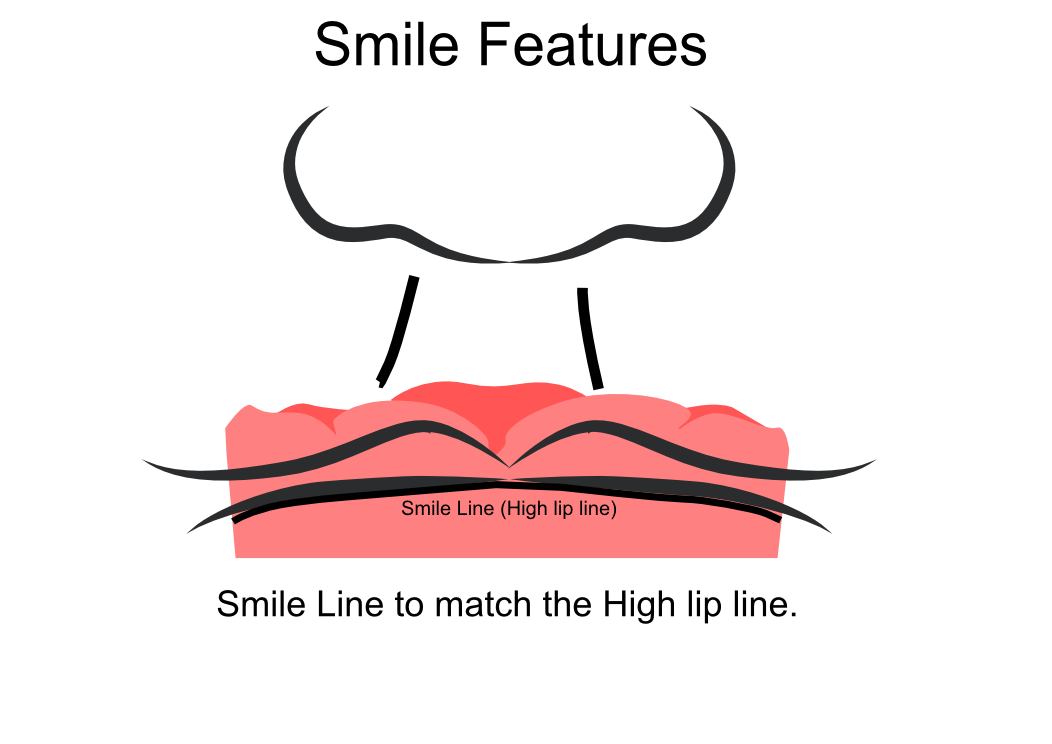
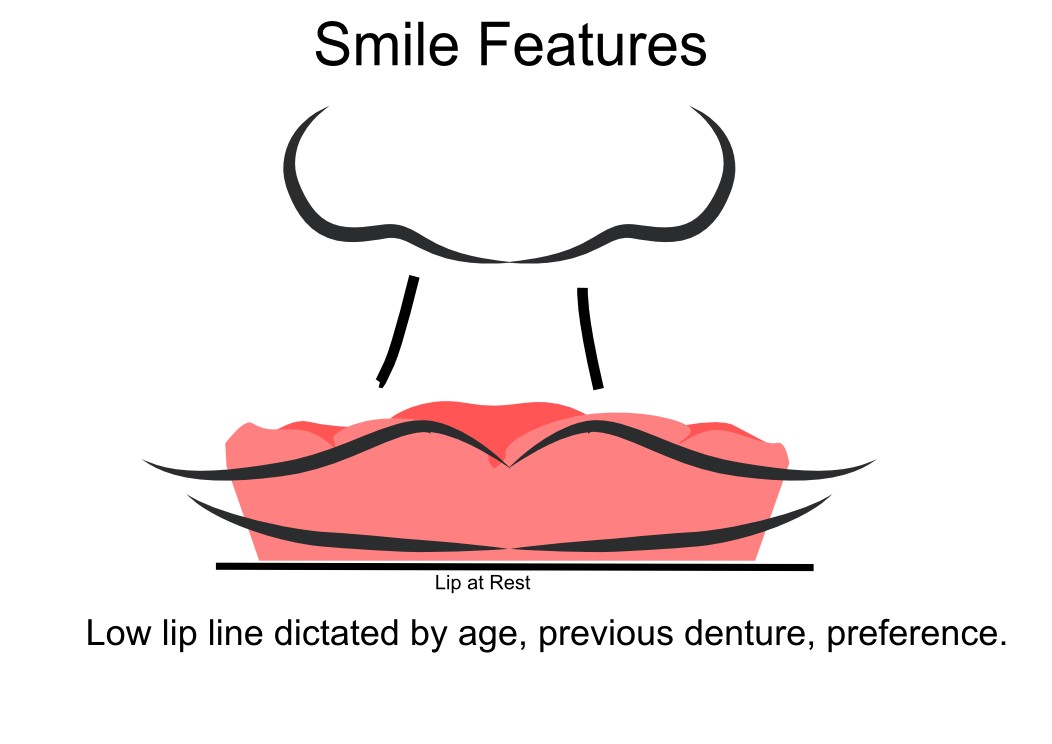
Smile Features
The smile features work in sync with the facial features, for the creation of the anterior aesthetic parameters. This also determines how much tooth should be shown when the patients is smiling or how much is shown when the patients lip is at rest.

For example when the patient smiles and shows too much gum, this would mean that the smile line should be set higher and the anterior teeth should either be set higher or more of the necks of the teeth exposed to correct the 'Gummy Look'. You can also place a longer tooth if it stays within the parameters of the facial feautres.

Smile line (High lip line):
The smile line is dictated from the bottom of the upper lip at the highest point (high lip line). Ask the patient to preform a big smile and scribe this on the bite block at that level (cold wax knife, never use a heated instrument). This dictates how much tooth and gum is shown when the patient smiles, it also  dictates the dentogenics of the smile by optimising tooth positioning.

Low lip line:
The low lip line is dictated by many factors including age. Ask the patient or use the previous denture to dictate how much bite rim should be shown and make sure you tell the patient that this is how much tooth will be shown when the lip is relaxed.

With the combined parameters of the facial features and smile features, it creates a box, within that box is the parameters for the aesthetics of the denture which dictates, the positioning, width and height of the anterior teeth.

Picture
Picture
Picture
Picture
A tooth setup in accordance with the patients facial and smile features
Picture
Picture
A tooth setup in accordance with the patients facial and smile features

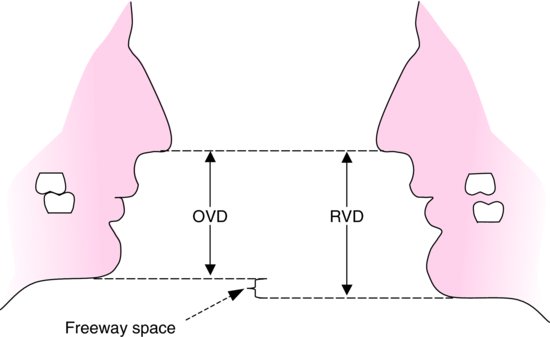
Step 3: Register The Bite

OVD, RVD & Free way space
Once the aesthetic parameters is set, we need to establish the functional parameters of the bite registration via vertical dimensions, jaw relationship and registering this by locking this information together.

The vertical dimension is obtained with the help of a Willis Guage. A Willis Gauge is a tool used to measure the vertical dimension in millimeters between the maxilla and mandible.

OVD (Occusal vertical dimension:
OVD (Occulsal vertical dimension) is an important factor for patients aesthetics and function. A reduced or increased OVD can cause complaints about aesthetics, function (e.g mastication and stabilisation) and may lead to discomfort.

OVD indicates the measurement between the occlusal relationship of the maxilla and mandible. For dentate patients, the OVD is established by occluding the maxillary and mandibular teeth together. In edentulous denture patients, this is established by placing bite rims in the maxillary and mandibular ridge and taking measurements , this can also be obtained from the patients previous set of dentures.

RVD (Resting vertical dimension):
RVD (Resting vertical dimension) indicates the measurement between the maxilla and mandible when the muscles are relaxed e.g not in occulsion, this is obtained by removing the lower denture and asking the patient to close their lips together without occluding.

FWS (Freeway space):
FWS (Freeway space) Free way space is between the RVD & OVD measurement of the maxilla and mandible when the mandible is in its physiologic rest position. This is usually between 2 – 4 mm.

How to use a Willis guage:
  1. The solid arm should be facing towards you
  2. The corner of the solid arm is placed on the base  underneathe the patients nose
  3. The second arm with the screw attachment is placed towards the border of the patients chin that slides up and down
  4. Lock the second arm into position via the screw on the movable arm, this will show the overall vertical dimension (OVD) in mm  e.g 45mm
  5. The RVD is then obtained by removing the lower denture and asking the patient to close their lips together without occluding and check the number on the Willis gauge e.g 47mm on the Willis gauge.

We calculate the FWS by subtracting the RVD from the OVD, this is now the free way space. e.g RVD 47mm – OVD 45mm = 2mm FWS. Increasing or decreasing the dimensions is dependent on the situation, for example if they have an old set of dentures you can use this by placing it into the patients mouth and taking a Willis guage reading and match the bite rims to this. Make sure that the wax blocks have even bilateral contact when establishing the bite.

If there is no previous denture present, you can visually see the patients facial muscles in determining if the OVD is correct. Often, if the OVD is increased or reduced beyond it physical dimensions the facial muscles will often indicate this by
facial tension.


Registering the bite rims:
Once the OVD is established, ask the patient to bite together several times and scribe a location mark between the posterior regions of upper bite rim and lower posterior part in a closed position, this will establish a reproducible jaw relationship. Asking the patient to roll their tongue backwards can help with creating a reproducible jaw relationship, if the patient has abnormal bite patterns.

Take the bite rims out and cut location grooves into posterior regions of the upper and lower bite rims to allow space for the bite registration material to flow into this area and lock together the U/L bite rims, this will register the bite and transfer the patients jaw relationship into the bite rims and will allow the dentist and technician to verify it’s accuracy.

Place the U/L bite rims into the mouth and ask the patient to bite together once more to check if the bite is reproducible via the location mark lines after you have cut the location grooves. Once the bite is reproducible and verified, open or place the bite reg paste in the posterior region areas of the location groove areas and ask the patient to close and wait for it to set. WARN the patient, when they open the bite rim will be joined together. Check and verify if needed.

Remember, all of the hard work preformed
will not work if a shade has not been taken.


Picture
Willis gauge being used on a patient
Picture
A bite rim showing all of the orientation, facial/smile features and jaw relationship
Picture
All the facial/smile features, orientation, OVD and jaw relationship transferred from the bite registration to the wax try in
Picture
An example of OVD, RVD and freeway space
Picture
A manchester bite rim sent to the laboratory for a try in, showing all of the orientation, facial/smile features and jaw relationship
Picture
A visual representation of how a bite reg relates to the patients features
Picture
The bite reg has been articulated and ready for a wax try in
DOWNLOAD THIS ARTICLE IN .PDF
Click the 'NEXT PART 2' button to find out how we transfer this information from the bite registration in the laboratory into a tryin stage.
Next - Part 2

Also see:

Picture
Picture

#denture #bite #registration #dentistry #dental #laboratory #newsletter #dentist #dentallaboratory #dentaltechnician #dentista #odontologia #teeth #health #healthcare #bremadent #london #digitaldentistry #cadcam #implants #prosthetics #dentures #crowns #orthodontics

0 Comments
    Private Dental Laboratory in London

      Subscribe to our ‘Dental Laboratory Newsletter’
      For updates on dentistry with important information, new products, promotions and technical / clinical guides via a newsletter.
    Subscribe

    Clinical Dental Technician Kash Qureshi - Bremadent Dental Laboratory & Swissedent Denture ClinicKash Qureshi - Managing Director, Clinical Dental Technician
    About the author:
    Kash Qureshi is a Clinical Dental Technician (Denturist) in the U.K who oversees and quality controls over 3000+ fixed and removable prosthesis including implant cases from a clinical and technical aspect monthly at Bremadent Dental Laboratory & Swissedent Denture Clinic in London.
    www.swissedent.co.uk  www.bremadent.co.uk [email protected]


    Picture

    Categories

    All
    Articles
    Case Studies
    Clinical Guides
    Laboratory News
    New Product
    Newsletter
    Press
    Technical Guides

    RSS Feed

    Archives

    May 2025
    April 2025
    March 2025
    February 2025
    January 2025
    December 2024
    November 2024
    October 2024
    September 2024
    August 2024
    July 2024
    June 2024
    May 2024
    April 2024
    February 2024
    October 2023
    September 2023
    August 2023
    December 2022
    November 2022
    October 2022
    September 2022
    January 2021
    September 2020
    June 2020
    May 2020
    April 2020
    March 2020
    February 2020
    January 2020
    December 2019
    November 2019
    October 2019
    September 2019
    August 2019
    July 2019
    June 2019
    April 2019
    March 2019
    February 2019
    January 2019
    December 2018
    November 2018
    October 2018
    September 2018
    August 2018
    July 2018
    June 2018
    April 2018
    March 2018
    February 2018
    January 2018
    December 2017
    October 2017
    September 2017
    August 2017
    July 2017
    June 2017
    May 2017
    April 2017
    March 2017
    February 2017
    January 2017
    December 2016
    September 2016
    August 2016
    July 2016
    June 2016
    May 2016
    April 2016
    March 2016
    February 2016
    January 2016
    December 2015
    November 2015
    October 2015
    September 2015
    August 2015
    July 2015

Let's Keep Connected!

HOME - ABOUT US - OUR SERVICES - CONTACT US
ADDRESS: 25A St James Street, London, E17 7PJ - PHONE: 0208 520 8528 - EMAIL: [email protected]
Subscribe to our newsletter!
© 2025 Bremadent Dental Laboratory - Sitemap

  • Home
  • About Us
    • Our Mission
    • Our Laboratory
    • Our Management Team
    • Our Clinic
    • Case Studies
    • Newsletter
    • Policies >
      • Terms & Conditions
      • Warranty & Remake
      • Cross Infection Control
      • Complaints Handling
      • COVID19
      • Terms of Use
      • Privacy Policy
    • Press
    • Working Times & Deliveries
    • Postage Portal
  • Our Services
    • Pay online
    • Price List
    • Bremadent Clinic
    • Digital >
      • Digital Dentures
      • Dental 3D Printed Models Shop
      • CAD-CAM
      • Dental 3D Printing
      • Digital Study Models
      • Digital Crown & Bridge
      • Digital Implantology
      • Digital Prosthetics
    • Crown & Bridge >
      • All ceramic >
        • Veneers
        • IPS e.max
        • Layered Zirconia Crowns (Cercon)
        • Full Contour Zirconia Crowns
        • Composite
      • Complex / Combination
      • Porcelain Bonded
      • Full Metal Crowns
      • Smile Make Overs & Diagnostic Wax Ups
      • Shade Matching
      • Executive Service
    • Implantology >
      • All on X immediate Implant Loading
      • Implant Crown & Bridge
      • Implant Prosthetics
      • Implant Milled Bars
      • Tempaplant 3 in 1
    • Prosthetics (Dentures) >
      • Digital Dentures
      • Swissedent Cosmetic Dentures
      • Valplast Flexible Dentures
      • Cobalt Chrome (CoCr)
      • Hybrid Chromes
      • Acetal frameworks / tooth coloured clasps
      • Characterised / Special effects
      • Denture Repairs
      • Fiber Force
    • Pressure Formed >
      • Anti - Snoring Devices
      • Gum Shields
      • Night / Mouth Guards
      • Whitening Trays
    • Orthodontics >
      • Kois Deprogrammer
      • Essix Retainers
      • Michigan / Tanner Splints
      • Zirconia Retainers
    • Clinical Guides
    • Downloads
  • App
  • News
  • Employment
  • Contact Us