• Home
  • About Us
    • Our Laboratory
    • Our Management Team
    • Our Clinic
    • Case Studies
    • Newsletter
    • Press
    • Policies >
      • Terms & Conditions
      • Cross Infection Control
      • Complaints Handling
      • COVID19
      • Terms of Use
      • Privacy Policy
    • Working Times & Deliveries
  • Our Services
    • Price List
    • Complex / Combination
    • Digital >
      • CAD-CAM
      • Digital Impressions
      • Digital Study Models
      • Digital Crown & Bridge
      • Digital Implantology
      • Digital Prosthetics
    • Crown & Bridge >
      • IPS e.max
      • Layered Zirconia Crowns (Cercon)
      • Porcelain Bonded
      • Full Contour Zirconia Crowns
      • Composite
      • Full Metal Crowns
      • Smile Make Overs & Diagnostic Wax Ups
      • Shade Matching
    • Implantology >
      • Tempaplant 3 in 1
      • Immediate Implant Loading
      • Implant Crown & Bridge
      • Implant Prosthetics
      • Implant Milled Bars
    • Prosthetics (Dentures) >
      • Denture Repairs
      • Cobalt Chrome (CoCr)
      • Hybrid Chromes
      • Swissedent Cosmetic Dentures
      • Valplast Flexible Dentures
      • Fiber Force
    • Pressure Formed >
      • Anti - Snoring Devices
      • Gum Shields
      • Night / Mouth Guards
      • Whitening Trays
    • Orthodontics >
      • Kois Deprogrammer
      • Essix Retainers
      • Michigan / Tanner Splints
      • Zirconia Retainers
    • Clinical Guides
    • Downloads
    • App
  • News
  • Employment
  • Contact Us
Bremadent Dental Laboratory - London UK
  • Home
  • About Us
    • Our Laboratory
    • Our Management Team
    • Our Clinic
    • Case Studies
    • Newsletter
    • Press
    • Policies >
      • Terms & Conditions
      • Cross Infection Control
      • Complaints Handling
      • COVID19
      • Terms of Use
      • Privacy Policy
    • Working Times & Deliveries
  • Our Services
    • Price List
    • Complex / Combination
    • Digital >
      • CAD-CAM
      • Digital Impressions
      • Digital Study Models
      • Digital Crown & Bridge
      • Digital Implantology
      • Digital Prosthetics
    • Crown & Bridge >
      • IPS e.max
      • Layered Zirconia Crowns (Cercon)
      • Porcelain Bonded
      • Full Contour Zirconia Crowns
      • Composite
      • Full Metal Crowns
      • Smile Make Overs & Diagnostic Wax Ups
      • Shade Matching
    • Implantology >
      • Tempaplant 3 in 1
      • Immediate Implant Loading
      • Implant Crown & Bridge
      • Implant Prosthetics
      • Implant Milled Bars
    • Prosthetics (Dentures) >
      • Denture Repairs
      • Cobalt Chrome (CoCr)
      • Hybrid Chromes
      • Swissedent Cosmetic Dentures
      • Valplast Flexible Dentures
      • Fiber Force
    • Pressure Formed >
      • Anti - Snoring Devices
      • Gum Shields
      • Night / Mouth Guards
      • Whitening Trays
    • Orthodontics >
      • Kois Deprogrammer
      • Essix Retainers
      • Michigan / Tanner Splints
      • Zirconia Retainers
    • Clinical Guides
    • Downloads
    • App
  • News
  • Employment
  • Contact Us

The History Of Natural Looking Dentures

4/22/2020

0 Comments

 
Download this article in .pdf
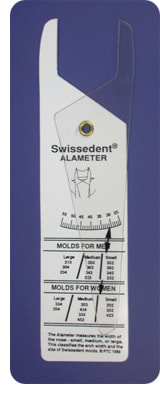
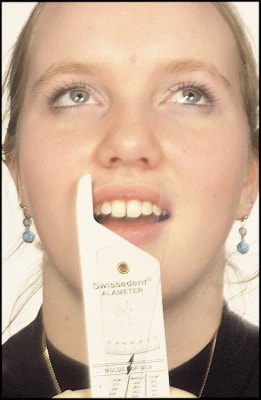
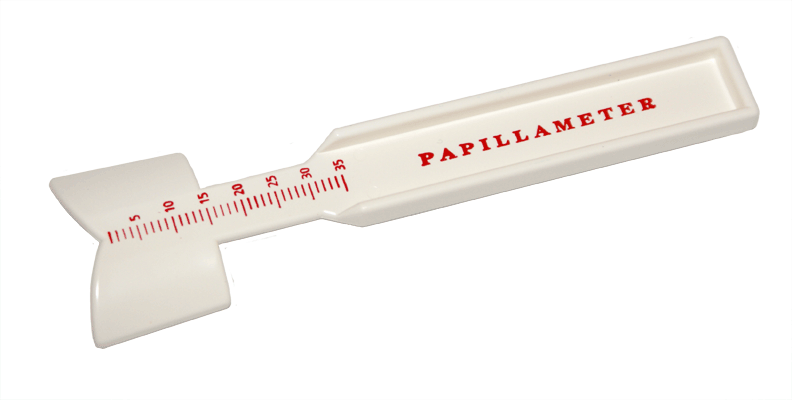
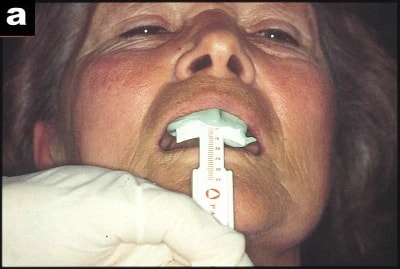
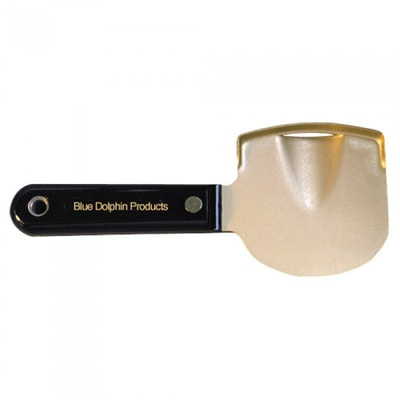
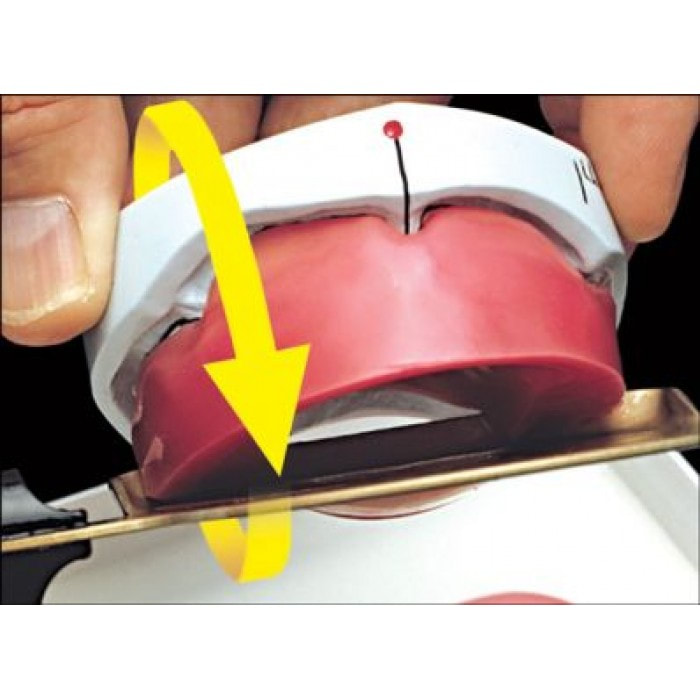
In 1951 Dr. John P. Frush, a graduate of the University of Southern California School of Dentistry, travelled to Switzerland to attend a postgraduate course in complete prosthodontics where he learnt about new procedures and products to restore the natural appearance of edentolous patients.

1 year later Dr. Frush landed exclusive distribution rights from Candulor AG to distribute their Swiss line of denture teeth in North America. Candulor sponsored Dr. Frush on this course and manufactured the most natural looking denture teeth Dr. Frush had ever seen. He then made a deal with Candulor to privatise a line of porcelain teeth under his company, Swissedent called the Swissedent 900 Series.

Dr. Frush later developed and patented macroscopic colour changes in the anterior porcelain denture teeth, which occur in natural dentition as a result of progressive incisial wear and pigmental penetration as a result of facial cracks in the enamel of the central incisor teeth which also included the blueish incisal edges of the lateral incisors. This became known as the physiologic colour combination, derived from the study of natural dentition.

Dr. Frush was a true visionary and wanted to change the denture industry beyond the sales of Swissedent teeth. He needed to develop the tools to go along with the Swissedent teeth to educate his fellow Dentists so they could also develop a more natural looking denture and gave him ideas of developing a new form of denture occlusion designed for edentulous patients.

Dr. Frush spent six years researching and developing, from his clinical research he found most denture wearers suffered with the stability of the lower denture, which was caused by opposing forces, created by the cusp occlusion. Monoplane occlusion was only used by a small number of Dentists due to its lack of bilateral balance and problems with functional mastication. After six years Dr. Frush approached Candulor to produce Centrimatic posterior teeth under the name Swissedent 900 series that had bilateral balancing throughout all function and eliminated all interceptions and inclined planes that created the instabilities.

Dr. Frush then formed the Swissedent Foundation an educational part of his company to help fellow dental professionals. He produced a series of six articles for the Journal of Prosthetic Dentistry on the Swissedent Technology between 1956 and 1958. The information in the  article became the required reading for Dental students in most Dental schools and gave over 300 courses on Swissedent protocols to graduate dentist and dental technicians, 50+ years later the same principles are at the forefront of most premium denture systems with only the aesthetics changing.

In 1960 Dr. Frush developed a device that made the anterior moulds more aesthetically pleasing and unique to the individual called the Alameter (Figure 1,2 - BDJ Nature.com), along side other devices developed called the Papillameter (Figure 3,4 - BDJ Nature.com), Rim Former (Figure 5, 6 Blue Dolphin Products) and Esthetic Control Base.

The Alameter was developed from studies that showed 96% of human noses where the same width as the four front anteriors. The Papillameter was developed to determine the distance in length from the incisive papilla to the upper lip at rest, which established how much tooth should be showed when the patient was relaxed. All of the devices developed is used to determine the optimum mould for the patient as well as the natural independent positioning of the anterior teeth according the age, sex and other factors of the patients.
In 1987, the Swissedent Corporation was sold to the John Ness of the Productivity Training Corporation (PTC) with conditions that Dr. Frush retained ownership of the Accu-Dent Reasearch & Development.

Mr. Ness was the founder of the Productivity Training Corporation and was well known for his ability to develop techniques that were easily understandable and transferable to other Dental Technicians.

In the 1980s Mr. Collin Lee a Qualified Dental Technician who owned one of the biggest and successful Dental Laboratories in the U.K, obtained exclusive rights to distribute the PTC system in the United Kingdom.

In the late 1980s a group was formed in the United Kingdom called the Private Prosthetics Group, which consisted of dentist and dental technicians and included Professor J. Fraser McCord, a graduate from Edinburgh University in 1970. Professor J. Fraser McCord provided articles, lectures and courses in the United Kingdom on the Swissedent System for other dentists and dental Technicians. 30+ years on and the articles are still required reading material for creating natural looking dentures.

In 1992, PTC had lost the right to sell the Swiss Line of teeth and products in North America from Candulour and also sold the right to use the name Swissedent to Austenal and Dentsply, which labelled Kenson teeth with the Swissedent brand.

In 1993, Dr. Smudde realised that this had taken place and knew that action had to be taken to bring the Swissedent brand back, Dr. Smudde went to Switzerland and acquired the distribution rights from Candulor for the same teeth imported and distributed by Dr. Frush under the name Swissedent. In 1994, Dr. Smudde formed Geneva Dental and created the trademark for the teeth under the Geneva 2000 for distribution in the US and Canada. In the same year he established the Geneva Dental Institute which provided education on the Geneva 2000 Prosthetic system. The same system, using the same tools Dr. Frush developed over 20 years ago.

Throughout the 1980s, in the United Kingdom the Swissedent system was used as the only system that had continuity between Dentists and Dental Technicians training in prosthetics and was used in many dental schools. It was the only system that had different training protocols for Dentists and Dental Technicians when added together created natural looking dentures.

In 2010, Mr. Kashif Qureshi a qualified Dental Technician who had trained on the Swissedent system, as an apprentice was applying to become a Clinical Dental Technician (Denturists) and open a Denture Clinic with the Swissedent name.

Between 2013 – 2015, Mr.Kashif Qureshi trained to become a Clinical Dental Technician, utilising all of the knowledge from the Swissedent system from the technical and clinical (Dentist & Dental Technician training system) aspect of Swissedent Dentures .

In 2015, Mr. Kashif Qureshi, a graduate from the University of Central Lancashire, opened the Swissedent Denture Clinic to treat patients for 'Natural Looking Dentures' from his combined knowledge of the technical and clinical aspects of the Swissedent system.

From 700 BCE to the breakthrough of natural looking dentures in 1951, the history of dentures will continue to live on. What will be next in our denture history?
Download this article in .pdf
0 Comments

The History of NHS Dentistry

4/22/2020

0 Comments

 
Download this article in .pdf
The launch of the NHS in 1948 meant, for the first time-ever, that dental care was free at the point of use, dramatically changing people's access to good oral healthcare, their expectations, and their appreciation of looking after their oral health.

The introduction of the NHS in 1948 gave the British population free access to dental treatment. There was a school dental service and a special priority service for expectant and nursing mothers, and young children that was organised by local authorities. However there was such a demand for dentures, nicknamed the dash for dentures, that a far higher proportion of the budget was spent on this than anticipated.

The poor state of British teeth had been highlighted at the end of the previous century by the British Army's recruits for the Boer War: of 208,300, there were 6,942 hospital admissions owing to dental causes, of which one third had to be sent home unfit to serve.

In 1948 the nation's dental health was in a worse state than that of defeated and occupied Germany: decay, pyorrhoea, and sepsis were rife. More than three quarters of the population over the age of 18 had complete dentures.

When the NHS opened for business on 5 July 1948, we estimate that just over a quarter of practising dentists had signed up to work in the NHS.

The demand for dental care on the new NHS was overwhelming. Dentists went from seeing around 15 to 20 patients a day to over 100. Patients had to be turned away, and hospitals also experienced a rise in cases. In the first nine months of its existence NHS dentists provided over 33 million artificial teeth, a figure that would rise to 65.5 million for the year 1950-1951.  

By 1951, the NHS was already running out of money. To help alleviate this, charges for dentures, the first charges of any kind for NHS treatment, were introduced causing much debate in government and the public arena and leading to the resignation of Aneurin Bevan, the Minister who had been crucial to bringing the NHS into existence. Article by BDA, The story of NHS Dentistry, accessed 18th April 2020)
Picture
Download this article in .pdf
Click below for the 'The History of Natural Looking Dentures':
Next part: The History Of Natural Looking Dentures
0 Comments

History Of Dentures

4/22/2020

0 Comments

 
Picture
Download this article in .pdf
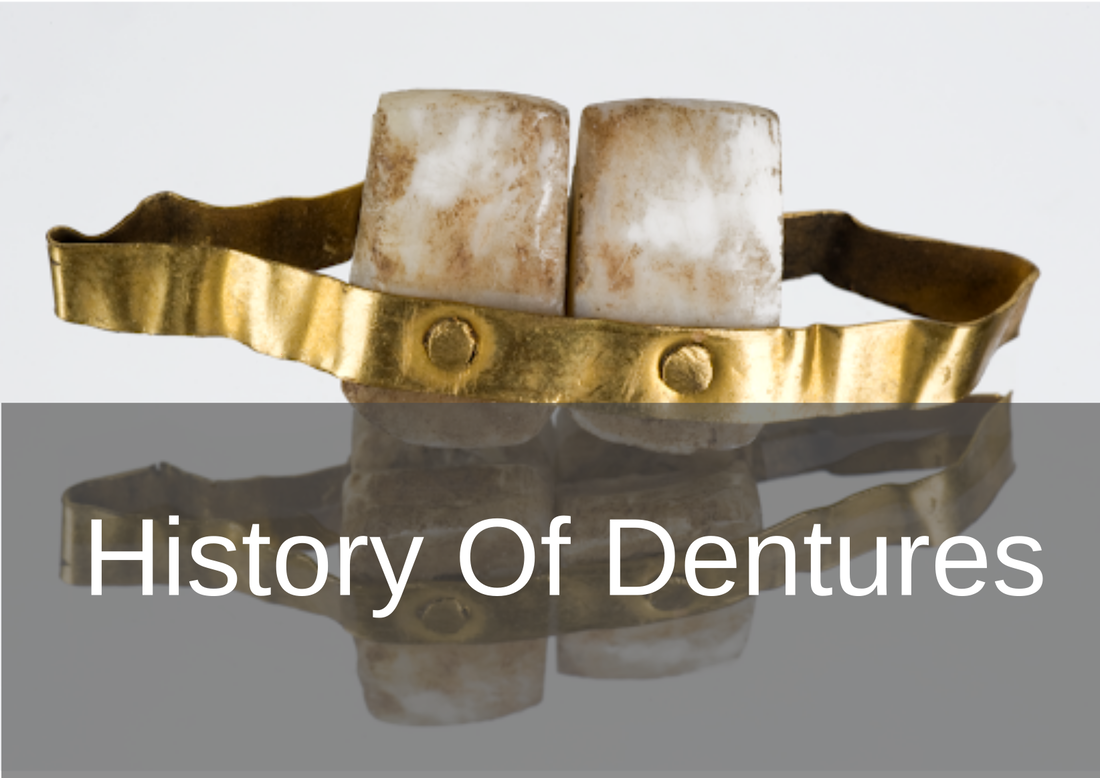
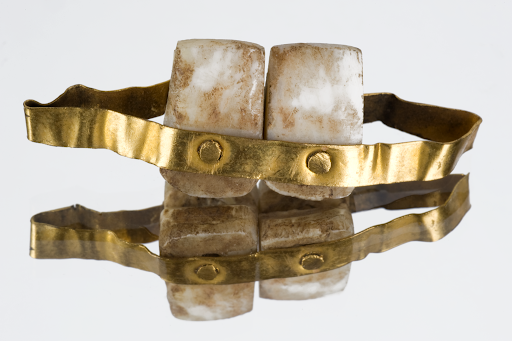
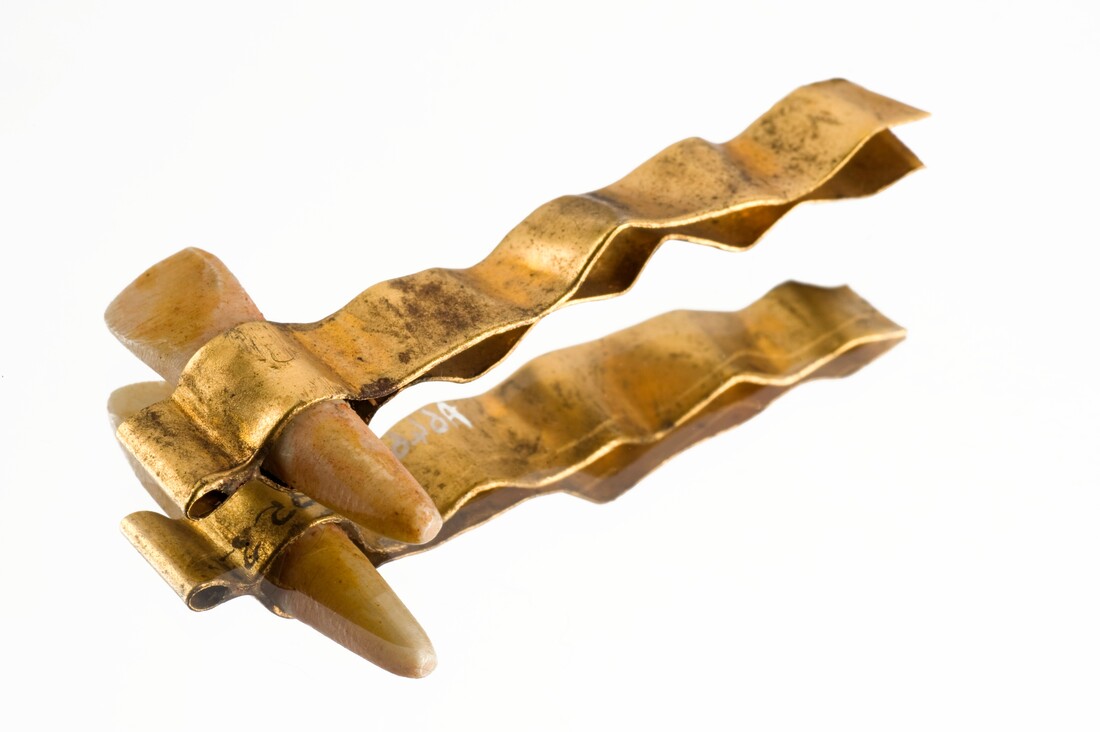
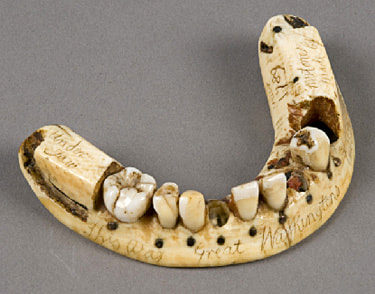
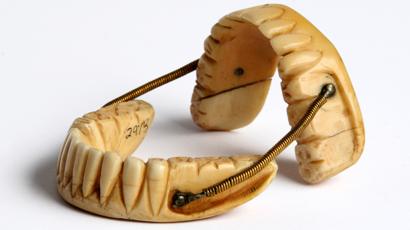
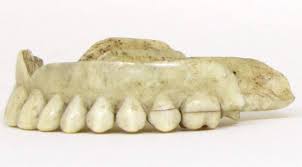
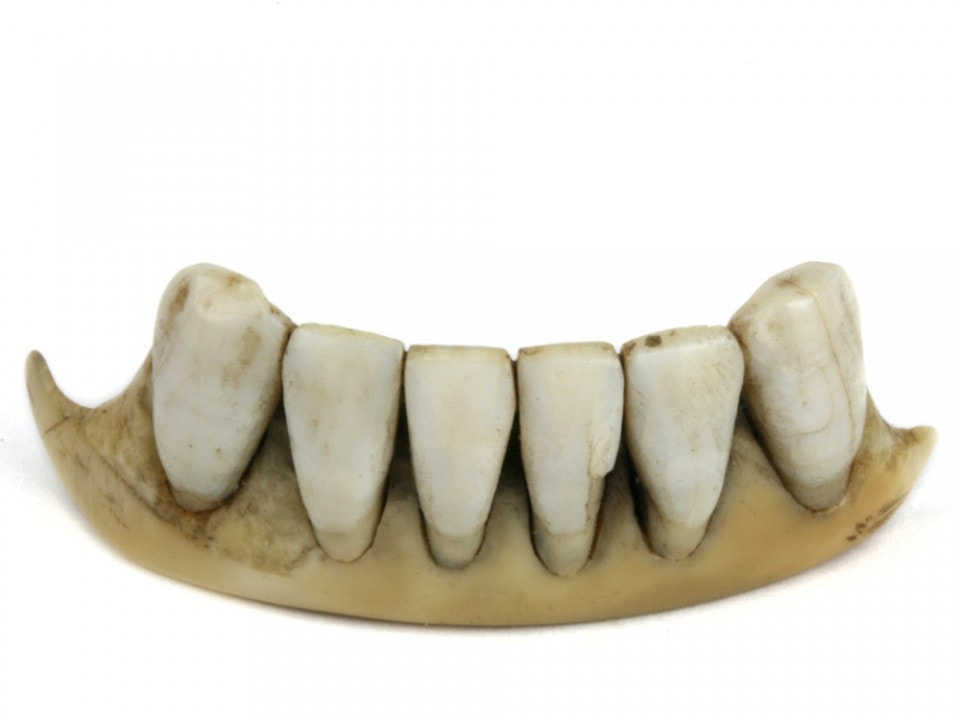
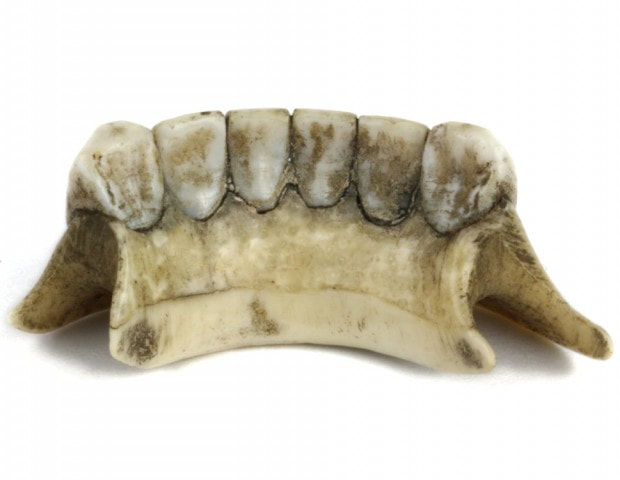
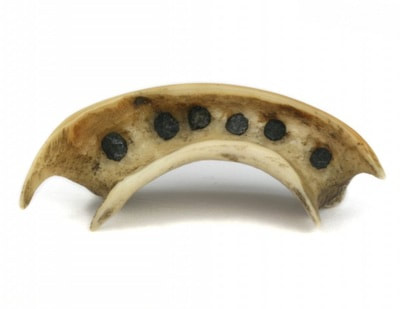
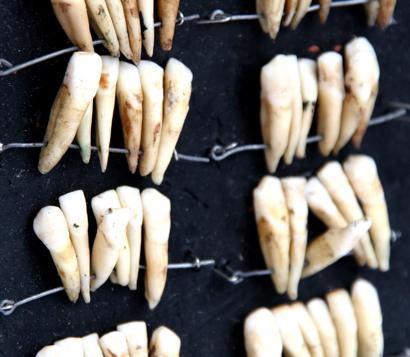
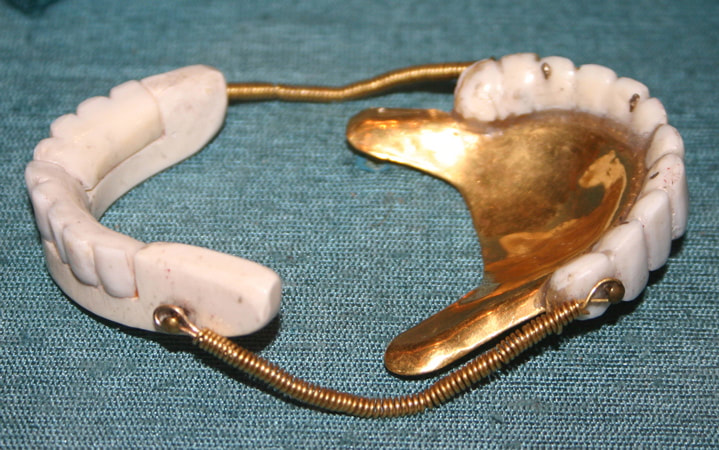
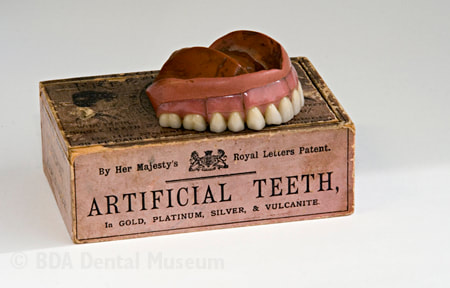
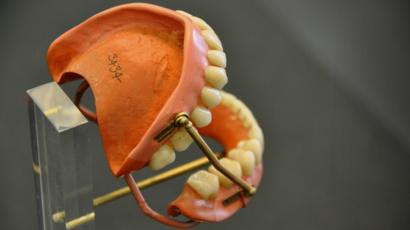
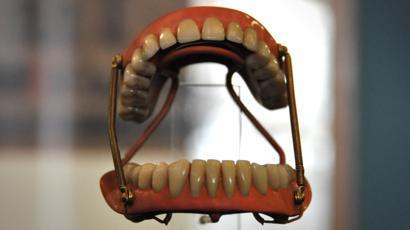
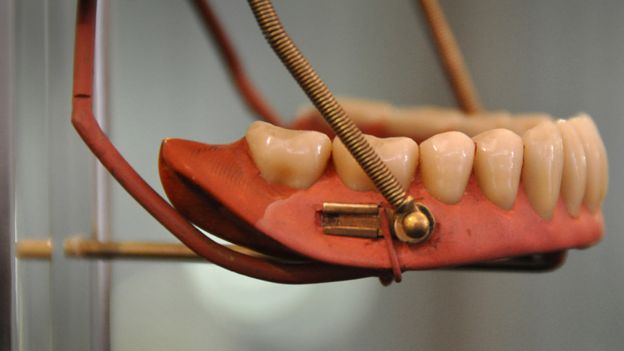
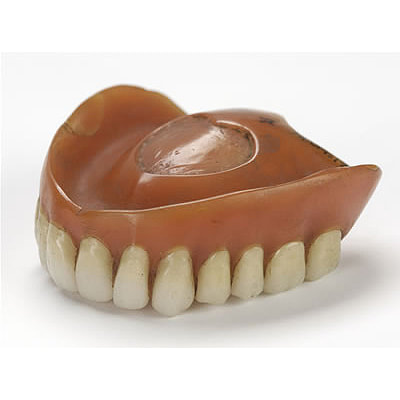
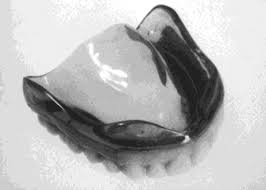
The History Of Dentures – Time Line From 700 BCE 

Year 700 BC
The first set of Dentures was made by Etruscan people living in Etruria (Umbria and Tuscany, Italy) from 700 BC onwards. Teeth was used from other humans or animals and was inserted and pinned together via a gold band with a metal pin and fitted onto the remaining teeth, this option was expensive and only for the wealthy. (Figure 1, 2 Copy of an Etruscan denture, Science Museum London)
Year 1600
In the early 1600s: Japan invented the first set of functional complete dentures out of wood (Figure 2) but later versions introduced the use of ivory, animal horns sculpted to mimic natural teeth. Animal's such as the hippopotamus and elephant ivory was carved into dentures to imitate  natural teeth. Over time, the ivory became stained and gave off a foul smell and were uncomfortable to wear. Full lower sets were weighted to help gravity. To help upper sets stay in place springs were attached to the bottom set and the spring thus pushed the upper set upwards.  (Figure 3, 4 BDA Dental Museum)

Year 1700
In the 1700's: John Hunter, attempted to transplant human teeth into a comb of a rooster. Studies showed this was unsuccessful although the tooth was firmly implanted in the rooster, it did not work for humans. Although it was considered unsuccessful it created principles for future implantation. Around the 1770s, Alexis Duchâtea created the first set of porcelain dentures. (Figure 5, source unknown)
Year 1800
In the early 1800s: A major source of teeth was scavenged from dead soldiers in the battle fields of Europe following the Battle of Waterloo. In 1815, dentures was constructed with the teeth of the dead soldiers and was known as ‘Waterloo Teeth’ and fixed onto a ivory base. (Figure 8 -12 BDA Dental Museum)

They would have been shaped and sorted to make it look like each set of upper and lower front teeth had come from a single body. The sets would have been sold to early dental technicians who would boil them, chop off the ends, and then shape them on to ivory dentures. (Figure 13, BDA Dental Museum)

Year 1820
In 1820: English goldsmith and dental manufacturer Claudius Ash mounted porcelain on 18-karat gold plates, with gold springs and swivels. (Figure 14, unknown source)

Year 1840 - 1850
In the 1840s - 1850s: The Goodyear family invented and developed a material that was used for the bases of dentures called Vulcanite. This material would replace the ivory in previous dentures with a hardened rubber material . The properties of Vulcanite allowed the material to be easily mouldable to a humans gums and harden without losing the shape of the gums. This was considered a cheaper option than gold denture bases which made dentures affordable for everyone. (Figure 15 - 19 BDA Dental Museum)
Year 1851
In 1851: Edwin Truman used Gutta Percha material as a replacement for Vulcanite but later found the material was unstable and needed complicated equipment. (Figure 20, unknown source)

Year 1868
In 1868:John Hayatt discovered a substitute material for Vulcanite called Celluloid, this was unsuccessful due to its absorption of stains, odours and the dentures colour changing to a black colour and being highly flammable as it used camphor as a plasticizer. (Figure 21, unknown source)

Year 1901
In 1901: Dr. Otto Rohn prepared studies on a new material called poly methyl methacrylate.

Year 1909
In 1909 Dr. Leo Bakeland discovered phenol-formaldehyde resin (bakelite) but was unsuccessful due its unstable dimensional properties and lack of uniformity, this was used in dentistry from 1924 and 1939.

Year 1937
In 1937 Dr. Walter H Wright presented the studies of the use of poly methyl methacrylate resin as a denture base to the National Society of Denture Prosthetics in America.

Year 1938 - present
From 1938 polymethylmethacylite (PMMA or acrylic resin) became prevailing material for denture base and acrylic teeth. It is hard, translucent and inert (has no unpleasant odor or toxicity), it can be easily repaired and it is inexpensive. The acrylic teeth and denture base chemically and mechanically bond together to provide a stable denture with excellent properties.

PMMA acrylic teeth are available variety of shades, shapes moulds to create a unique, realistic denture, which allow the ‘Dental Professional’ to create a functional, natural looking denture unique to the patient. (Figure 22, Metrodent, Candulor)

PMMA denture base comes in a variety of shades to realistically match the pigment of the gingiva with high flexural strength properties (Figure 23, Diamond D, Keystone Industries).
Download this article in .pdf
Click below for the next part: ' The History of NHS Dentistry'
Next Part: The History Of NHS Dentistry
0 Comments

Bite Registration In Dentures - Clinical Guide

4/17/2020

0 Comments

 
Picture
DOWNLOAD THIS ARTICLE IN .PDF
The first stage of any denture case is: Patient details & history, denture history, E/O & I/O examinations, diagnoses, prognosis, treatment options and a treatment plan.

How to take bite registration is broken down into 3 steps:

Step 1: Orientation
Step 2: Facial and smile features
Step 3: Register the bite

Tools: Fox’s bite plane, rim former, Willis gauge, wax knife, Bunsen burner, PVS dispensing gun.
Materials: Wax, bite registration paste.

Step 1: Orientation

Information from the patient facial & smile features creates the parameters for the technician to work too. As the Technician will not see the patient, we have to provide this information in a form that they will understand e.g lines scribed on a bite rim.

The retention, extension, stability and support of each base plate would be the assessed individually before continuing. If any of the above is not correct preform an imp wash inside of the base plate and have a new model made. If all of the above is sufficient, continue assessment: 

Orientation: Frontal Plane & Occulsal Plane
For establishing the orientation a Fox’s Bite Plane tool is used. Fox’s Bite Plane establishes the orientation of the occlusal plane in an anteroposterior direction (Spee curve) and also the frontal plane with the interpupillary line.

With the use of a fox’s bite plane we assess the frontal plane by placing the fox plane on the bite block anteriorly and checking if it's parallel to the interpupillary line. Adjust the anterior section if one side is higher or lower until this is level and parallel to the interpupillary line. Use a heated Rim Former or carve the wax..

The occlusal plane is assessed by placing the fox plane in the same position and placing a horizontal device e.g ruler from the ala of the nose to the tragus of the ear and making sure the orientation of the fo’x bite plane is parallel to to this.

This will set the parameters of how the anterior and posterior teeth will be placed for aesthetics, phonetics, comfort, chewing efficiency and balanced occlusion.  

Tissue support is determine by preference, clinical decision e.g checking the profile buccally of the previous denture. This determines how far the anterior teeth will be positioned forward and how thick the anterior flange will be.

Step 2: Facial & Smile Features

Facial Features
Facial features sets the aesthetic parameters for the anterior teeth in terms of mould selection, e.g width and height of anterior teeth & positioning of the teeth within the centre line & canine lines. All facial features should be scribed onto the upper bite registration.

The centre line (mid line) is dictated via the philtrum, DO NOT use the nose, as this can be give a false reading as the nose is not usually centralised with the mid line of the face and can be skewed. This allows centralisation of the upper centrals to the exact mid-line of the patient.  

The canine line is dictated via the width of the nose, this is common in 95% of humans. This determines the width of the anterior teeth. The canines should not go past this line, unless other factors dictate the canine lines e.g patient preference. The body or the labial mesial body should be on or just after this line in the tooth set up, this will allow a natural alignment within the patients facial features.


Smile Features
Smile features work in sync with the facial features, for the creation of the anterior aesthetic parameters. This also determines how much tooth should be shown when the patients is smiling or how much is shown when the patients lip is at rest, for example when the patient smiles and shows too much gum, this would mean that the smile line should be set higher and the anterior teeth should either be set higher or more of the necks of the teeth exposed to correct the 'Gummy Look'.

The smile line is dictated from the bottom of the upper lip at the highest point (high lip line). Ask the patient to preform a big smile and scribe this on the bite block at that level (cold wax knife, never use a heated instrument). This dictates how much tooth neck and gum is shown when the patient smiles, it also can dictates the dentogenics of the smile by optimising tooth positioning.

The low lip line is dictated by many factors including age. Ask the patient or use the previous denture to dictate how much bite rim should be shown and make sure you tell the patient that this is how much tooth will be shown when the lip is relaxed.

With the combined parameters of the facial features and smile features, it creates a box, within that box is the parameters for the aesthetics of the denture which dictates, the positioning, width and height of the anterior teeth.


Step 3: Register The Bite

OVD, RVD & Free way space
Once the aesthetic parameters is set, we need to establish the functional parameters of the bite registration via vertical dimensions, jaw relationship and registering the bite.

The vertical dimension is obtained with the help of a Willis Guage.
A Willis Gauge is a tool used to measure the vertical dimension in millimeters between the maxilla and mandible.

OVD (Occulsal vertical dimension) is an important factor for patients aesthetics and function. A reduced OVD will cause complaints about aesthetics and an increased OVD may lead to discomfort.

OVD indicates the measurement between the occlusal relationship of the maxilla and mandible. For dentate patients, the OVD is established by occluding the maxillary and mandibular teeth together. In edentulous patients, this is established by bite rims placed on the maxillary and mandibular ridge, this can also be obtained from the patients previous set of dentures.

RVD (Resting vertical dimension) indicates the measurement between the maxilla and mandible when the muscles are relaxed e.g not in occulsion, this is obtained by removing the lower denture and asking the patient to close their lips together without occluding.

FWS (Freeway space) Free way space is the established between the RVD & OVD measurement of the maxilla and mandible when the mandible is in its physiologic rest position. This is usually between 2 – 4 mm.

With the help of a Willis guage, the solid arm facing towards you on will be placed on the base of the patients nose and the second arm towards the border of the patients chin that slides up and down . You then lock it into position via the screw on the movable arm, this will show the overall vertical dimension (OVD) in mm.

The RVD is then obtained by removing the lower denture and asking the patient to close their lips together without occluding and check the number on the Willis gauge e.g 47mm on the Willis gauge.

Now we calculate the FWS by subtracting the RVD from the OVD, this is now the free way space. e.g RVD 47mm – OVD 45mm = 2mm FWS. Increasing or decreasing the dimensions is dependent on the situation for example if they have an old set of dentures. Make sure that the wax blocks have even bilateral contact when establishing the bite.

If there is no previous denture present, you can visually see the patients facial muscles in determining if the OVD is correct. Often, if the OVD is increased or reduced beyond it physical dimensions the facial muscles will often indicate this by
facial tension.


Once the OVD is established, ask the patient to bite together several times and scribe a location mark between the posterior regions of upper bite rim and lower posterior part in a closed position, this will establish a reproducible jaw relationship. Asking the patient to roll their tongue backwards can help with creating a reproducible jaw relationship if the patient has abnormal bite patterns.

Take the bite rims out and cut location grooves into posterior regions of the upper and lower bite rims to allow space for the bite registration material to flow into this area and lock together the U/L bite rims, this will register the bite and transfer the patients jaw relationship into the bite rims and will allow the dentist and technician to verify it’s accuracy.

Place the U/L bite rims into the mouth and ask the patient to bite together once more to check if the bite is reproducible via the location mark lines. Once the bite is reproducible and verified, open or place the bite reg paste in the posterior region areas of the location groove areas and ask the patient to close and wait for it to set. Warn the patient, when they open the bite rim will be joined together. Check and verify if needed.

Remember, all of the hard work preformed
will not work if a shade has not been taken.


DOWNLOAD THIS ARTICLE IN .PDF
Click the 'NEXT PART 2' button to find out how we transfer this information from the bite registration in the laboratory into a tryin stage.
Next - Part 2

Also see:

Picture
Picture

#denture #bite #registration #dentistry #dental #laboratory #newsletter #dentist #dentallaboratory #dentaltechnician #dentista #odontologia #teeth #health #healthcare #bremadent #london #digitaldentistry #cadcam #implants #prosthetics #dentures #crowns #orthodontics

0 Comments

(Early) May 2020 - Dental Laboratory Newsletter

4/15/2020

0 Comments


#dental #lab #dentistry #dental #laboratory #newsletter #dentist #dentallablondon #dentallaboratory #dentaltechnician #dentista #odontologia #teeth #health #healthcare #bremadent #london #digitaldentistry #cadcam #implants #prosthetics #dentures #crowns #orthodontics
0 Comments
<<Previous
    Private Dental Laboratory in London

      Subscribe to our ‘Dental Laboratory Newsletter’
      For updates on dentistry with important information, new products, promotions and technical / clinical guides via a newsletter.
    Subscribe

    Clinical Dental Technician Kash Qureshi - Bremadent Dental Laboratory & Swissedent Denture ClinicKash Qureshi - Managing Director, Clinical Dental Technician
    About the author:
    Kash Qureshi is a Clinical Dental Technician (Denturist) in the U.K who oversees and quality controls over 3000+ fixed and removable prosthesis including implant cases from a clinical and technical aspect monthly at Bremadent Dental Laboratory & Swissedent Denture Clinic in London.
    www.swissedent.co.uk  www.bremadent.co.uk office@bremadent.co.uk


    Picture

    Categories

    All
    Articles
    Case Studies
    Clinical Guides
    Laboratory News
    New Product
    Newsletter
    Press
    Technical Guides

    RSS Feed

    Archives

    January 2021
    September 2020
    June 2020
    May 2020
    April 2020
    March 2020
    February 2020
    January 2020
    December 2019
    November 2019
    October 2019
    September 2019
    August 2019
    July 2019
    June 2019
    April 2019
    March 2019
    February 2019
    January 2019
    December 2018
    November 2018
    October 2018
    September 2018
    August 2018
    July 2018
    June 2018
    April 2018
    March 2018
    February 2018
    January 2018
    December 2017
    October 2017
    September 2017
    August 2017
    July 2017
    June 2017
    May 2017
    April 2017
    March 2017
    February 2017
    January 2017
    December 2016
    September 2016
    August 2016
    July 2016
    June 2016
    May 2016
    April 2016
    March 2016
    February 2016
    January 2016
    December 2015
    November 2015
    October 2015
    September 2015
    August 2015
    July 2015

 Subscribe to our newsletter!

ADDRESS:  25a St James Street, London, Walthamstow,  E17 7PJ -  PHONE:  0208 520 8528 - EMAIL:  office@bremadent.co.uk
© 2022 Bremadent Dental Laboratory - Sitemap

  • Home
  • About Us
    • Our Laboratory
    • Our Management Team
    • Our Clinic
    • Case Studies
    • Newsletter
    • Press
    • Policies >
      • Terms & Conditions
      • Cross Infection Control
      • Complaints Handling
      • COVID19
      • Terms of Use
      • Privacy Policy
    • Working Times & Deliveries
  • Our Services
    • Price List
    • Complex / Combination
    • Digital >
      • CAD-CAM
      • Digital Impressions
      • Digital Study Models
      • Digital Crown & Bridge
      • Digital Implantology
      • Digital Prosthetics
    • Crown & Bridge >
      • IPS e.max
      • Layered Zirconia Crowns (Cercon)
      • Porcelain Bonded
      • Full Contour Zirconia Crowns
      • Composite
      • Full Metal Crowns
      • Smile Make Overs & Diagnostic Wax Ups
      • Shade Matching
    • Implantology >
      • Tempaplant 3 in 1
      • Immediate Implant Loading
      • Implant Crown & Bridge
      • Implant Prosthetics
      • Implant Milled Bars
    • Prosthetics (Dentures) >
      • Denture Repairs
      • Cobalt Chrome (CoCr)
      • Hybrid Chromes
      • Swissedent Cosmetic Dentures
      • Valplast Flexible Dentures
      • Fiber Force
    • Pressure Formed >
      • Anti - Snoring Devices
      • Gum Shields
      • Night / Mouth Guards
      • Whitening Trays
    • Orthodontics >
      • Kois Deprogrammer
      • Essix Retainers
      • Michigan / Tanner Splints
      • Zirconia Retainers
    • Clinical Guides
    • Downloads
    • App
  • News
  • Employment
  • Contact Us